Java Exploits and Cybersecurity
Lesson on Java exploits and cybersecurity.
- HTTP vs HTTPS Sites
- TCP and TLS
- Other Common Exploits
- What is a SQL Inject
- What does an SQL Inject look like?
- Methods of SQL Injects
- What is XSS?
- 3 Main Types of XSS:
- CORS (Everyone’s Favorite!), MVC and Nginx
- Where can you find CORS and how can you modify it and add it to your site?
- MVC and Nginx
- DotEnv
- Hacks
HTTP vs HTTPS Sites
These are the two types of sites, HTTP being insecure and HTTPS being secure.
There are two types of sites, HTTP and HTTPS sites. One is obviously more secure than the other but why and how exactly is it more secure? The following sections will give an overview of this.
Popcorn Hack: Why is HTTPS more secure than HTTP?
HTTPS sites encrypt HTTP requests with TLS (SSL) and have added verification measures. Sites need to file a certificate to be secured.
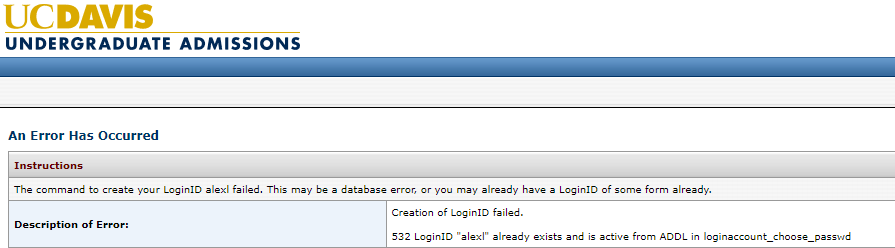
HTTP
In this case we are looking at posting passwords without encryption. Going to vulnweb.com, a common test site for vulnerabilities, we can test and see how insecure data can be dangerous. Keep in mind that this is illegal to do on actual websites and networks.
We use a network scanner to track information between the internet and the client device. In this example we enter test data in to the username and password inputs:
It looks like everything is secure to the user, the password is blocked from your general view and the website seems slightly trustworthy with it’s formatting. This is, however, very far from the truth, especially when we begin using the network scanner to see the traffic.
Here we see something that we are all familiar with, a POST. When we open the contents of this post, we can see the following:
We can see the password in plain text that was inputted in the password field of the website. This is a very clear reason why you should never store your passwords without the use of encryption, like with TCP and TLS handshakes.
HTTPS
If I, for example, log into MyPlan, we can see an entirely different story:
Here we see no POST, mainly because we are using something called TCP and TLS handshakes, which create an encrypted connection between the user and backend server.
TCP and TLS
Describing the encryption and communication protocols between servers for secure data.
This handshake process allows for a secure and encrypted method for sensitive data to be transferred between the client and server.
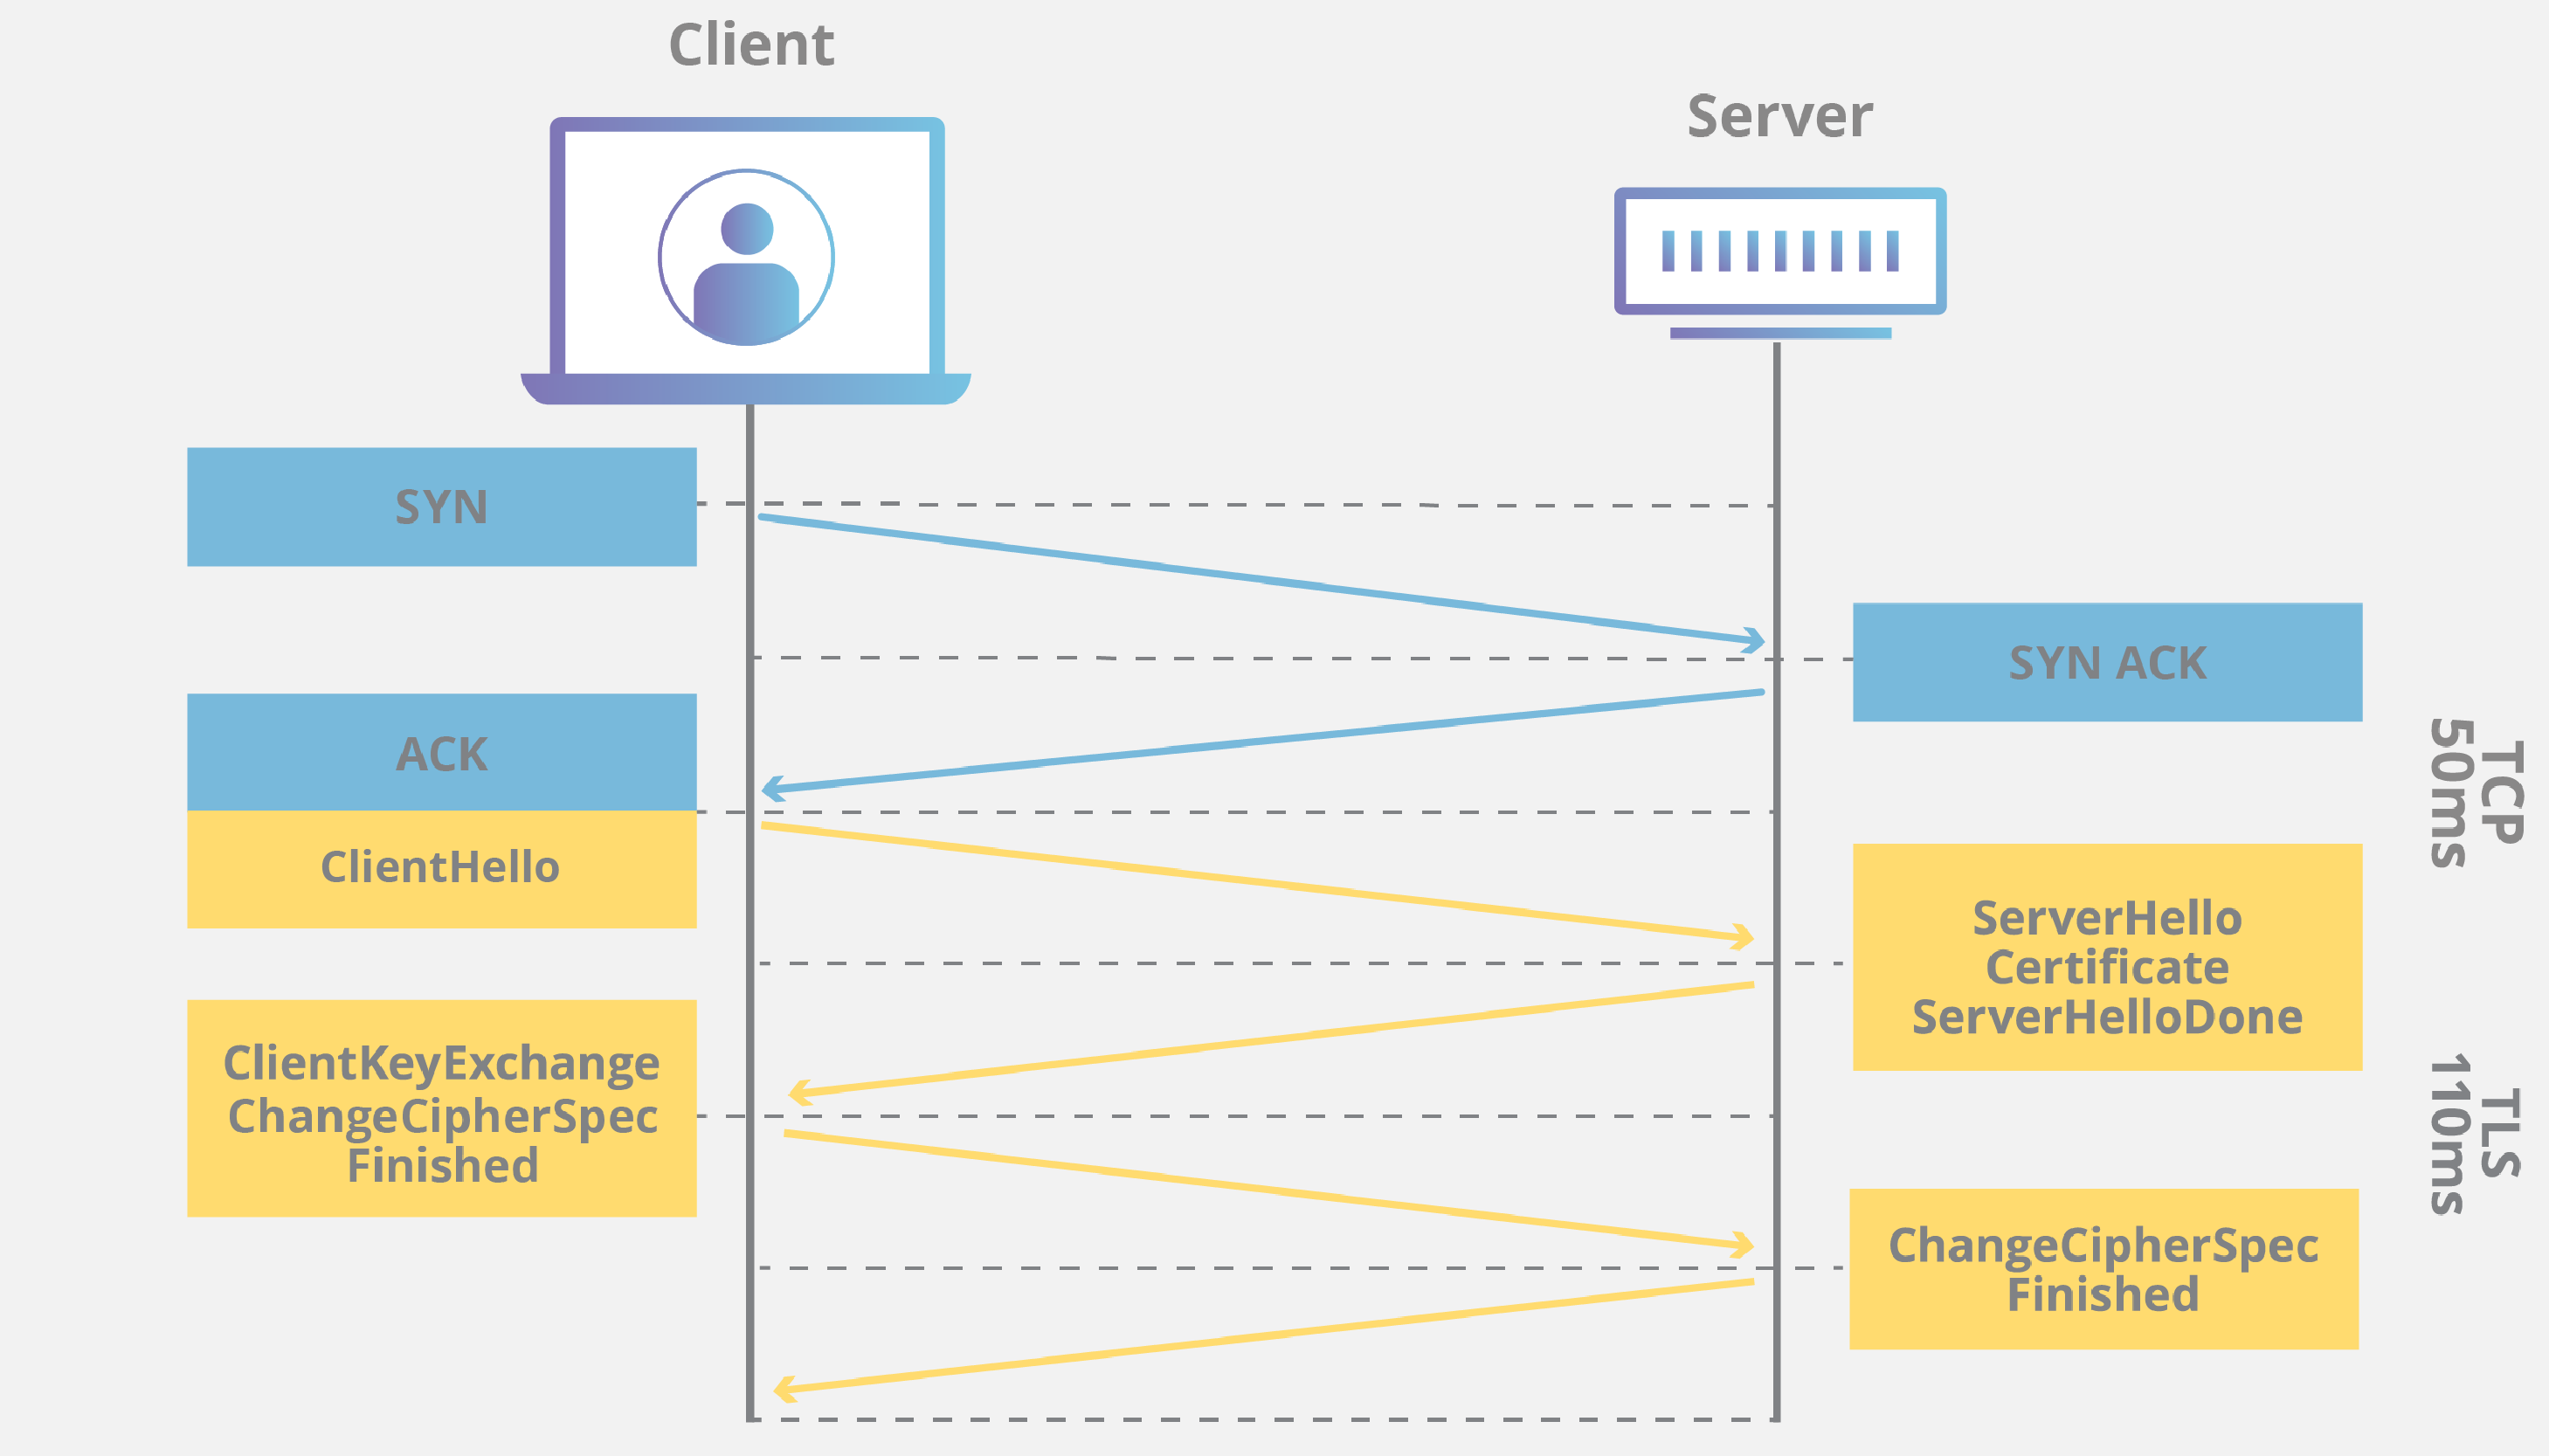
TCP Three-Way Handshake
The step process of connecting to the server securely.
A TCP handshake, more specifically a three-way handshake, is how the client and server initially establish a connection that is later used for communication. This method isn’t secure by itself however it helps later establish a TLS connection which is more secure.
Process
- SYN (syncronize) - initiates connection
- sends ISN (initial sequence number) that is used as an identifier, organizing the data sent/received correctly
- SYN-ACK (synchronize-acknowledge) - acknowledgement of connection
- sends it’s own ISN and the client’s ISN, confirming a connection
- ACK (acknowledge) - completing the connection
- indicates that it knows the server’s ISN
The server is now ready for a TLS connection.
TLS Handshake
This is where the encrypted data is transferred between the client and server. This exchange varies on the version of TLS that is used, however they all have a similar series of steps.\
This is how secure communication of secure information is sent between the client and server. This is how the more common TLS version 1.2 typically works, however with the recent TLS v1.3, the basic steps remain the same.
- Client Hello - begins connection
- send the TLS version that is supported, agreeing on a method of communication
- provides the supported cipher suites, deciding on method of encryption
- creates and sends string of random bytes used to create entropy in creating the pre-master secret
- Server Hello - server response confirming connection
- selects the highest supported TLS version, creating compatibility
- selects a compatible cipher suite
- creates another random string of bytes contributing to the creation of the pre-master secret
- Authentication - SSL certificate
- server sends the SSL certificate for client to read
- Pre-Master Secret - shared secret between client and server
- used to make session keys for safe transmission of data
- this makes sure that only the server can access any data transmitted
- Session Keys - common set of keys
- used to decrypt any information sent between client and server
- Finished Message - finishes setting up encryption
- the client and server can now send and receive encrypted data
The server and client can now exchange information with a smaller risk than without encryption.
Note: Encryption is not 100% safe. TLS 1.2 has been recently replaced with TLS 1.3, due to RSA being deemed insecure when compared to ECDHE (Elliptic Curve Diffie-Hellman). This is because RSA is relatively shorter in length and with the advance of quantum computing is easier to decrypt. You can learn more about this here.
Popcorn Hack: In your own words describe how the TCP and TLS handshakes work to create a reliable and secure connection between the client and server.
The connection starts with the client sending the TLS version, supported cipher suites, and random bytes that are used as a secret code. The server then confirms the connection with the client, selecting the best supported TLS version and cipher suite, and another random code. The SSL certificate is then sent by the server for the client to read for authentication. After that, the pre-master secret is used to create session keys that exclusively allow the server to access the transmitted data during the transaction. The session keys are used to decrypt information that is encrypted during the process of sending to and from the client and server. This is the end of the process that allows for the transfer of encrypted data.
Other Common Exploits
These are some exploits that may be used through the browser to not only steal information through packet sniffing but also download malicious content that can gather sensitive data.
Phishing
This is another way that hackers can more directly steal information.
Moving away network interception exploits, this is another common tool that is extremely easy to replicate with the right knowledge. Websites that mask themselves as other websites usually catch people that don’t pay much attention to what they click. It is extremely easy to create such sites that are port-forwarded through local nginx servers, capturing data that unsuspecting visitors may enter. These sites usually use simple POST actions to transmit the data to the server, making these sites not only dangerous to access because they steal information but also dangerous because they are easy to intercept as previously mentioned. Here are a few examples of what they might look like:
Computer Exploits
Hackers can also steal information through malware that is installed onto a user’s computer.
Information doesn’t always have to be stolen through the transmission of data to servers. It can also be stolen with local software. Some common methods are:
- Viruses
- attach themselves to programs and replicate as that host program runs
- Worms
- self-replicating programs that spread across networks
- Trojans
- malware disguising itself as another software within other system
- Spyware
- tracking data about the user like keystrokes, online activities, and sensitive information
- Ransomware
- encrypts user data and demands ransom for decryption key
- Rootkits
- modify system files to hide malware
All of these are types of malicious software that can be used to steal the information of people. Such software is usually installed due to a lack of precautions from the user of a device, resulting from clicking on links that contain malware. This can be very easily prevented by using the following:
- Using a strong password that would be hard to guess.
- Use 2FA when you are able to.
- Be careful which websites you visit.
- Don’t click on random links.
- Be careful of emails.
- Having an updated system with the latest security features.
- Using the latest antivirus program to secure your device.
- Make sure all encryption you are using isn’t outdated.
- Use secure Wi-Fi networks.
- Use the latest security encryption on your Wi-Fi networks.
- Use trustworthy VPNs when on public networks.
Popcorn Hack: Research three specific example of such attacks that have occurred throughout history.
I listed them here.
- Stuxnet was a worm that was partially a rootkit. It was discovered in 2010 but it had been developed since 2005. It is believed to have done serious damage to the Iran nuclear program.
- The “ILOVEYOU” virus was a worm that targeted Windows computers in 2000. An email would show a “LOVELETTER” and, if you opened the attachment, it would then send that to all other people in the Outlook address book
- BonziBuddy is a program that has been described as spyware, adware, and malware. It was very common in the late nineties even into the early 2000’s. It’s the purple monkey guy.
What is a SQL Inject
Often times, web services provide users the choice to input data, which is then sent to the backend of the service. This data could then be processed and be stored in a database table for future use. A SQL Inject takes advantage of this relationship. Since every database interaction can be represented with an SQL query, if our input data happened to be a SQL fragment that completed the query to perform unexpected tasks, then isn’t it possible for us to gain unauthorized access to the database?
These are some of the notable SQL Inject breaches in the past years:
- GhostShell attack (Targetted university records)
- Turkish government (Breached government website to wipe national debt)
- 7-Eleven breach (Stole credit card information from corporate systems)
Popcorn Hack:
Name three more ways of how an SQL Inject could be used for malicious actions, and what are the consequences of each action?
I listed them here.
- An insecure bank could lose important user information stored in this sort of database, leading to many users having their financial details and access compromised
- The hacker could give himself an admin role that allowed for free access to important info
- An injector could overload a database with garbage data that prevents users from accessing their info with proper credentials or even breaks the database
What does an SQL Inject look like?
Pretend our school had a website has a simple function that returns a users information when they input their unique id and password (that only they know about). To retrieve this information, our backend has the following SQL query:
SELECT * FROM users_info WHERE uuid = 1920450 AND password="5994471abb01112afcc18159f6cc74b4f511b9980";
On the frontend, we may expect an html table that lists the information of the user who corresponds to the id that we inputted. Maybe something that looks like this
| ID | Student | GPA | Rank |
|---|---|---|---|
| 1920450 | Alexander Lu | 3.85 | 79 |
If we were normal students, we should think this is enough security. Unique user IDs, hashed passwords, everthing is chill right?
WRONG!!!!
Performing the Inject
Now, knowing the name of the table, we could do a lot more with this feature. Even if I wasn’t a student who knew his ID for a look up, I could still perform an SQL inject on this service. What if instead of an ID, I entered the following string as my query?
1927347 OR 1=1; --
This might not make sense the first time you see it, but lets place this into our last SQL query to see how it looks now.
SELECT * FROM users_info WHERE uuid = 1927347 OR 1=1; -- AND password="5994471abb01112afcc18159f6cc74b4f511b9980";
Let’s break down each part of the string:
1927347: A random uuid that we supplied, THIS DOESN’T EVEN HAVE TO EXIST. You’ll see why.OR: A boolean condition in SQL, essentially makes it so that only one of the conditions must be met for the command (SELECT * FROM users_info) to execute properly.- Now do you see where we are going with this?
1=1: A simple arithmetic statement that is ALWAYS TRUE- Even if our id isn’t correct because the fact 1=1 is true for every record of the table, our database now thinks we want to return every single row.
; --: The semicolon finishes up our sql query, and the – comments out the rest of the SQL query, maintaining the integrity of our statement and allowing the injected query to run properly.
Our frontend now might look something like this:
| ID | Student | GPA | Rank |
|---|---|---|---|
| 1923498 | Alexander Lu | 3.85 | 79 |
| 1910483 | David Vasilev | 3.85 | 77 |
| 1899283 | Ethan Zhao | 4.00 | 22 |
| ... | ... | ... | ... |
Popcorn hack:
Explain briefly, what a SQL inject is, in your own words, and how it functions:
An SQL inject involves editing an SQL statement in the backend to contain unwanted information that allows the hacker to view secret or sensitive information.
Methods of SQL Injects
There are many different ways of performing an SQL inject. Ultimately, it hinges on your knowledge of SQL syntax to game whatever query that your target has set up. Here are just some of the few strategies I’ve learned over the years, but you can gain addiitonal practice from doing CTF challenges.
Using keyword OR
Essentially, this was the strategy that you saw above. The intuition behind this strategy is offering an alternate condition for a Given SQL statement to succeed, to bypass any authentication checks. Keep in mind that there might be additional query after the ineject, so we would require SQL comments like -- to ensure our inject works properly.
Using Union
The UNION keyword in SQL is often used to join two SQL statements together, more specifically, the SELECT statement. What this allows us to do is to get the results of two seperate SELECT statements, and can be used to give us additional info on the database’s structure by writing a new command. Take the SQL statement from above:
SELECT * FROM users_info WHERE uuid = ... AND password='...';
The statement created by the server only looks for info in the users_info table. But with union, we can add an additional query to the end of this. For this example, I’ll be performing an inject on the uuid field. The inject will look something like this:
123' UNION SELECT name, sql from sqlite_master;--
Now the actual query looks like this:
SELECT * FROM users_info WHERE uuid ='123' UNION SELECT name, sql from sqlite_master;-- ... AND password=';
Even if the first select statement doesn’t return anything, our union statement will select the name and schema of the database in the backend. However, this command only works for an sqlite server, as we know the name of the table to be sqlite_master, and probably won’t work for any services hosted through MySQL, MariaDB, Postgresql or etc.
An Example I saw last week
Protecting Against SQL injects
Obviously, if every company’s database and services were fragile enough to be attacked with SQLinjects, the world would be in flames. There are many ways and methods to protect against these attacks.
Placing Limits on User Inputs
A common, and simple strategy to use is to place restrictions on what the user can input. Much of our SQLinjects rely on adding additional SQL statements and code to execute what we wish for it to do. Some of the following tactics could work to protect against SQL Injects:
- Reducing the maximum input length
- Restricting the use of special characters used for query (; - ‘ etc.)
- Validating user input (try not to use textboxes if you can, utilize selection boxes, dropdown menus, etc.)
- Principle of least privilege
- Do not give DELETE, INSERT, UPDATE permissions if not needed. Give the least authority on the databse that’s required for the service to function.
Parameterized Statements
Often in the backend, we may construct SQL Queries using string concatenation. DON’T DO THIS. While it is convinient, using parameterized statements are much more secure. considering the following two examples:
import java.sql.*
// The user we want to find.
String email = "user@email.com";

// Connect to the database.
Connection conn = DriverManager.getConnection(URL, USER, PASS);
Statement stmt = conn.createStatement();

// Bad, bad news! Don't construct the query with string concatenation.
String sql = "SELECT * FROM users WHERE email = '" + email + "'";

// I have a bad feeling about this...
ResultSet results = stmt.executeQuery(sql);

while (results.next()) {
  // ...oh look, we got hacked.
}
import java.sql.*
// Connect to the database.
Connection conn = DriverManager.getConnection(URL, USER, PASS);

// Construct the SQL statement we want to run, specifying the parameter.
String sql = "SELECT * FROM users WHERE email = ?";

// Generate a prepared statement with the placeholder parameter.
PreparedStatement stmt = conn.prepareStatement(sql);

// Bind email value into the statement at parameter index 1.
stmt.setString(1, email);

// Run the query...
ResultSet results = stmt.executeQuery(sql);

while (results.next())
{
    // ...do something with the data returned.
}
In the first example, we used regular string concatenation to construct our query. When we send our final query statement to the database manager, it just executes the query simply as it is, even if a malicious party injected harmful code into it. This is BAD
In the second example, we used parameterized statements and then proceeded to update our query statement with the desired value. This allows the databse driver to interpret the SQL statement before executing, which gives us the ability to prevent injected harmful code from running. The data is treated as data, not as SQL queries. This is GOOD.
From my knowledge, I believe our current spring inmplementation uses Object Relational Mapping to make Database entries act as Java objects. These implementations typically already use aprameterized statements, which serves to add a layer of security to our applications. However, ORM applications still allow you to concatenate strings for more complex SQL queries, which could still result in a vulnerability.
There are alot more ways of securing against SQL attacks, like client-side validation, but you can research that on your own, if you write a blog on it, it could be a good reason to add points to your hacks.
What is XSS?
XSS (Cross Site Scripting) is a security vunerability.
OCCURS WHEN an attacker injects malicious scripts into web pages that are viewed by other users.
The scripts can be executed in the context of a user’s browser, leading to potential harm:
- Stealing sensitive information
- Session hijacking
- Defacing websites
A term needed to know to understand XSS is payload: A “payload” refers to the malicious code or set of instructions that an perpetrator (attacker) delivers to a target system to achieve a specific objective, ex. stealing information from others.
Popcorn hack: What are two other possible harms of XSS?
XSS can trick a user into downloading a Trojan, redirect to a more malicious site, and steal the user's session ID.
3 Main Types of XSS:
Stored XSS:
General Definition: Occurs when the malicious script is permanently stored on the target server and served to users whenever they access the compromised page.
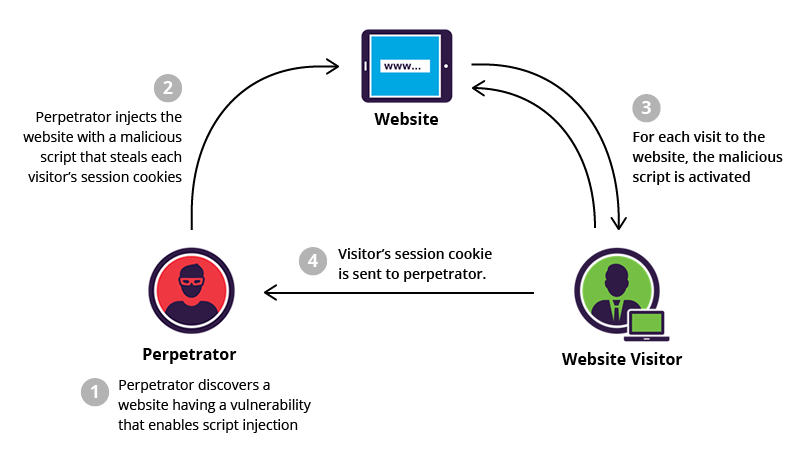
Steps based on the diagram:
- Perpetrator Discovers Vulnerability:
- Description: The attacker, known as the perpetrator, identifies a website that has a security vulnerability, often related to inadequate input validation or output encoding.
- Objective: The goal is to find a weakness that allows the injection of malicious scripts into the web application.
- Injection of Malicious Script:
- Description: The perpetrator injects a malicious script into the vulnerable website. This script is designed to execute specific actions when loaded by visitors’ browsers.
- Objective: The injected script is crafted to steal sensitive information, commonly session cookies, from users who visit the compromised page.
- Activation of Malicious Script:
- Description: Whenever a visitor accesses the perpetrated website, the injected malicious script is activated within their browser.
- Objective: The script executes in the context of the user’s session, enabling the attacker to carry out actions on behalf of the user or extract sensitive information.
- Sending Stolen Session Cookies:
- Description: The malicious script, now activated during each visitor’s session, collects the session cookies of the users.
- Objective: The stolen session cookies are sent back to the perpetrator, who can then use these cookies to impersonate the users, gaining unauthorized access to their accounts.
Example: An attacker discovers that a website allows user-generated content without proper input validation. They inject a script into a comment section, and whenever other users view that comment, the malicious script executes in their browsers, stealing their session cookies. The attacker then uses these stolen session cookies to log in as the compromised users.
Reflected XSS:
General Definition: The injected script is part of the user’s request and reflected back to the user, often via a crafted link. Unlike a Stored XSS, it doesn’t exist on the target server, rather it exists in the malicious link.
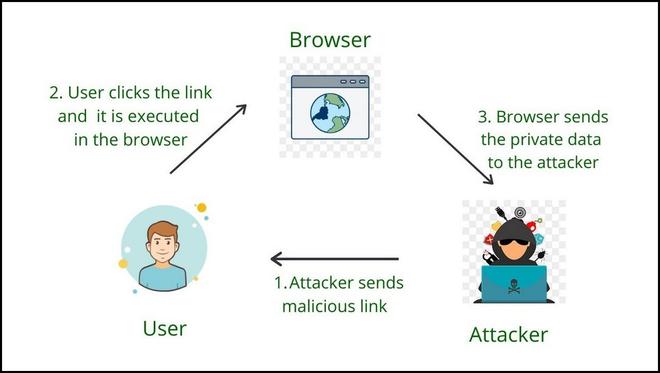
Steps based on the diagram:
- Perpetrator Sends Malicious Links:
- Description: The attacker, known as the perpetrator, sends crafted and malicious links to potential victims.
- Objective: The links contain specially crafted payloads, often in the form of parameters in the URL, that exploit vulnerabilities on the targeted website.
- User Clicks the Link and Execution in the Browser:
- Description: A user receives the malicious link and clicks on it.
- Objective: The payload embedded in the link is executed within the user’s browser, exploiting the vulnerability on the target website.
- Browser Sends Private Data to the Attacker:
- Description: As a result of the executed payload, the user’s browser performs actions on the targeted website, often unintentionally.
- Objective: The payload may include code that steals sensitive information, such as session cookies or other private data, from the user’s session.
Example: An attacker discovers a website with a search feature that reflects the user’s input in the URL without proper validation. The attacker sends a crafted link to a user, and when the user clicks it, the payload in the URL is reflected back by the website. This payload includes a script that steals the user’s session cookie and sends it to the attacker.
DOM-based XSS:
General Definition: DOM-based Cross-Site Scripting (DOM-based XSS) is a type of Cross-Site Scripting attack where the vulnerability is located in the Document Object Model (DOM) of a web page. Unlike traditional XSS attacks, where the malicious payload is inserted into the HTML content, DOM-based XSS occurs in the client-side script itself.

Steps based on diagram:
- Attacker Crafts a Malicious URL:
- Description: The attacker creates a specially crafted URL containing a malicious payload, typically in the fragment part of the URL (e.g., after the # symbol).
- Objective: The goal is to inject malicious JavaScript code into the victim’s browser.
- User Opens the Link:
- Description: The attacker tricks the user into opening the malicious link, causing the victim’s browser to make a request to the targeted website with the malicious payload.
- Objective: The user’s action initiates the process of loading the targeted website.
- Website Receives the Request:
- Description: The targeted website receives the user’s request, including the malicious payload in the URL fragment.
- Objective: Despite receiving the payload, the website does not directly include it in the response to the user.
- Legitimate Script Execution:
- Description: The website processes the request and sends a response to the user’s browser. The response may include legitimate client-side scripts.
- Objective: The user’s browser executes the legitimate scripts included in the response, causing the page to render as intended.
- Execution of Malicious Script:
- Description: During the legitimate script execution, the browser processes the malicious payload included in the page, leading to the execution of the attacker’s injected script.
- Objective: The attacker’s script is executed in the context of the user’s session, allowing it to perform malicious actions, such as stealing sensitive information.
- Sensitive Information Sent to Attacker:
- Description: The executed malicious script carries out actions, such as stealing user-sensitive information (ex. session cookies), which is then sent to the attacker’s server.
- Objective: The attacker gains unauthorized access to the victim’s information, potentially leading to further exploitation.
Popcorn Hack: Provide an example of DOM-based XSS…
Example: The Samy Kamkar worm was an XSS worm implemented on MySpace in late 2005 that was mostly harmless, displaying “but most of all, samy is my hero” on the person’s profile if they viewed another profile with the worm’s effect on it. It spread rapidly. Kamkar was raided and given a felony charge as a result.
CORS (Everyone’s Favorite!), MVC and Nginx
What is CORS and what does it actually do?
- CORS stands for Cross Origin Resource Sharing and it works to defend the the server side (APIs and the Backend)
- When you make a request on the client side (the frontend site), you’re sending a request to another site which has an API, CORS works to protect sensitive data and make sure that only authorized websites and the site with the server to have access to the data.
Where can you find CORS and how can you modify it and add it to your site?
If you go to any backend server you git cloned from Mr.Mort’s spring_portfolio, if you go ahead and navigate to SecurityConfig.java under /src/main/java/com/nighthawk/spring_portfolio/ and scroll down, you see the following the code:
.cors(Customizer.withDefaults())
.headers(headers -> headers
    .addHeaderWriter(new StaticHeadersWriter("Access-Control-Allow-Credentials", "true"))
    .addHeaderWriter(new StaticHeadersWriter("Access-Control-Allow-ExposedHeaders", "*", "Authorization"))
    .addHeaderWriter(new StaticHeadersWriter("Access-Control-Allow-Headers", "Content-Type", "Authorization", "x-csrf-token"))
    .addHeaderWriter(new StaticHeadersWriter("Access-Control-Allow-MaxAge", "600"))
    .addHeaderWriter(new StaticHeadersWriter("Access-Control-Allow-Methods", "POST", "GET", "OPTIONS", "HEAD"))
    .addHeaderWriter(new StaticHeadersWriter("Access-Control-Allow-Origin", "http://link1", "http://link2", "http://link3", "http://link4"))
What this is showing is the different things that a request must include in order for a request from a site to go through
.addHeaderWriter(new StaticHeadersWriter("Access-Control-Allow-Credentials", "true")):
- This header indicates whether the browser should include credentials (like cookies, HTTP authentication, and client-side SSL certificates) in the request
- This is typically used when the server needs to send and receive cookies on the requested domain.
.addHeaderWriter(new StaticHeadersWriter("Access-Control-Allow-ExposedHeaders", "*", "Authorization")):
- This header, enables you to specify custom headers (“*”) and grants the browser to expose headers like “Authorization” to the client.
.addHeaderWriter(new StaticHeadersWriter("Access-Control-Allow-Headers", "Content-Type", "Authorization", "x-csrf-token")):
- This line is listing the headers that the client is allowed to use in the actual request
.addHeaderWriter(new StaticHeadersWriter("Access-Control-Allow-MaxAge", "600")):
- This line specifies that the results of a preflight request can be cached for in this case, 600 seconds
- What this does in other words is before the actual request is received, a small request is typically sent and this request is saved for 600 seconds allowing for it so when similar calls are made, the result of the initial call is reused, this improves the performance and latency.
.addHeaderWriter(new StaticHeadersWriter("Access-Control-Allow-Methods", "POST", "GET", "OPTIONS", "HEAD")):
- This line just lists the different HTTP methods that are allowed when making a request
.addHeaderWriter(new StaticHeadersWriter("Access-Control-Allow-Origin", "http://link1", "http://link2", "http://link3", "http://link4")):
- This line simply specifies what links are allowed to make requests to the server
Frontend Side of CORS
- Based on the headers you assigned in the backend, your frontend fetch request must match what you defined
Some key reminders:
- When working with an API on the backend, in the areas where you want to protect the data, don’t forget to do
import org.springframework.web.bind.annotation.CrossOrigin;and include@CrossOriginbefore the actual code
MVC and Nginx
MVC
- MVC stands for Model View Controller, and its purpose is to build user interfaces and web applications and divides the application into three interconnected components: Model, View, and Controller
Model:
- The model is responsible for managing data and the logic and rules for manipulating the data
- It is independent from the user interface and works with the View and Controller
View:
- The view is the part that works and is responsible for receiving the user input and presenting the data to the user
- It receives updates from the Model and sends the user input to the Controller
Controller:
- The controller functions to update the Model and sends the updates to the View
- It makes and handles the decisions that the user makes, updating the Model and View to adapt to it
A great example of the MVC system would be the PersonAPI on the spring_portfolio, where the Person.java is the Model, PersonDetailsService.java is the View, and the PersonAPIController.java is the controller
MVC functions:
- MVC serves in order to make the code separated into different roles and parts allowing for it to be easily maintained and easily reusable. It also provides great extendability and makes it really easy to test the code since each part is essentially independent from each other.
Nginx
Nginx is a web server and reverse proxy server that has a wide variety of functions that enable for better performance, security, and connections between a client and the server. Some its most important features include:
- Web Server
- Nginx is able to handle incoming HTTP and HTTP requests from the client side with high performance, and can enable for the the direct serving of static content to the client side
- This enables for really efficient delivery of static resources to the web applications
- Reverse Proxy
- Nginx is a reverse proxy server as well and what this means is it takes requests from the frontend and connects it with the backend server and takes the response from the server and sends it back to the frontend
- This serves to shield the backend from being exposed to the internet and also enables many frontend clients to communicate with the backend
- Balancing Loads
- Nginx also helps to distribute the incoming requests and traffic equally among the backend servers and as a result, prevents the backend from being overwhelmed
- As a result, this significantly helps the performance and the maintenance of the backend server and enables for efficient communications
- SSL/TLS Termination:
- Nginx also can decrypt and encrypt the incoming data, from the frontend, sending it to the backend server
- This functions as a way to both ensure secure communications and also serves as a process to make the backend focus on running logic instead of attempting to understand the request
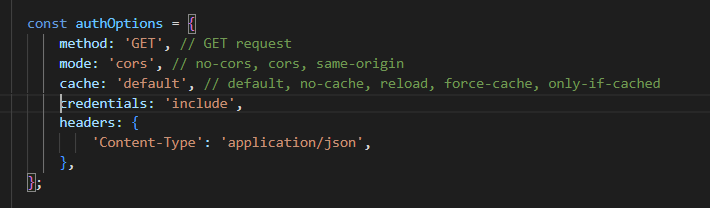
DotEnv
What is DotEnv?
- DotEnv is the use of a .env file in a project to manage sensitive information like API keys, database credentials, and other information.
- The term “dotenv” is often associated with a specific library or tool that helps load these variables into the application’s environment.
- Its purpose is to avoid putting sensitive information, such as access tokens, directly into the source code or version control and instead it is put in the .env file, which is specific to each environment.
To make it work
- Navigate to your project’s root directory using the command line:
cd /home/kaiden_d0/vscode/kaidencsablog - Initialize a new package.json file for your project:
npm init -y - Now, you can install dotenv:
npm install dotenv
- Make sure to add the .env file to your .gitignore so the sensitive information is not exposed
Popcorn Hack
Make your own .env file, and make the js file display your own secret information (put screenshots).
I did so below.
Here are the contents of .env:
API_KEY=3v1l53cr3tk3y!
DATABASE_URL=www.awesomedatabase.org/drewmadethis/apis
I went ahead and put it in .gitignore so that version control isn’t able to make it visible. I then created homework.js.
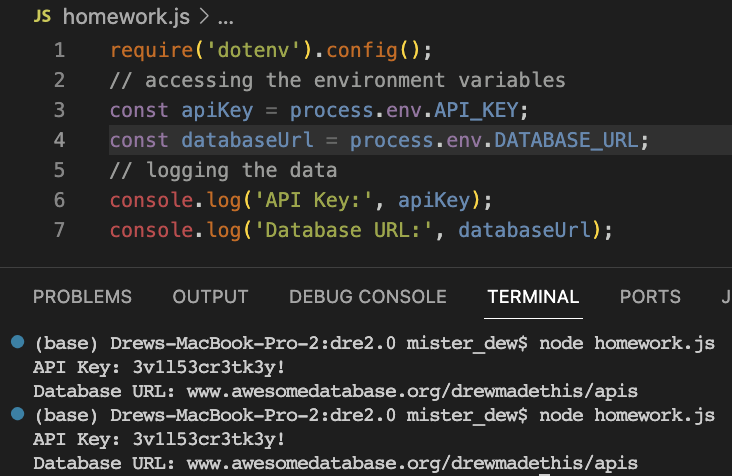
I wanted to make sure to show the output and the contents of the JS file to show proper functionality. As you can see, the data from the .env file shown above is properly outputted by this JS file.
Hacks
- Create a PicoCTF account: Link -> go to Practice -> go to Web Exploit -> Complete any 5 challenges and blog about them.
Challenge 1: "login"
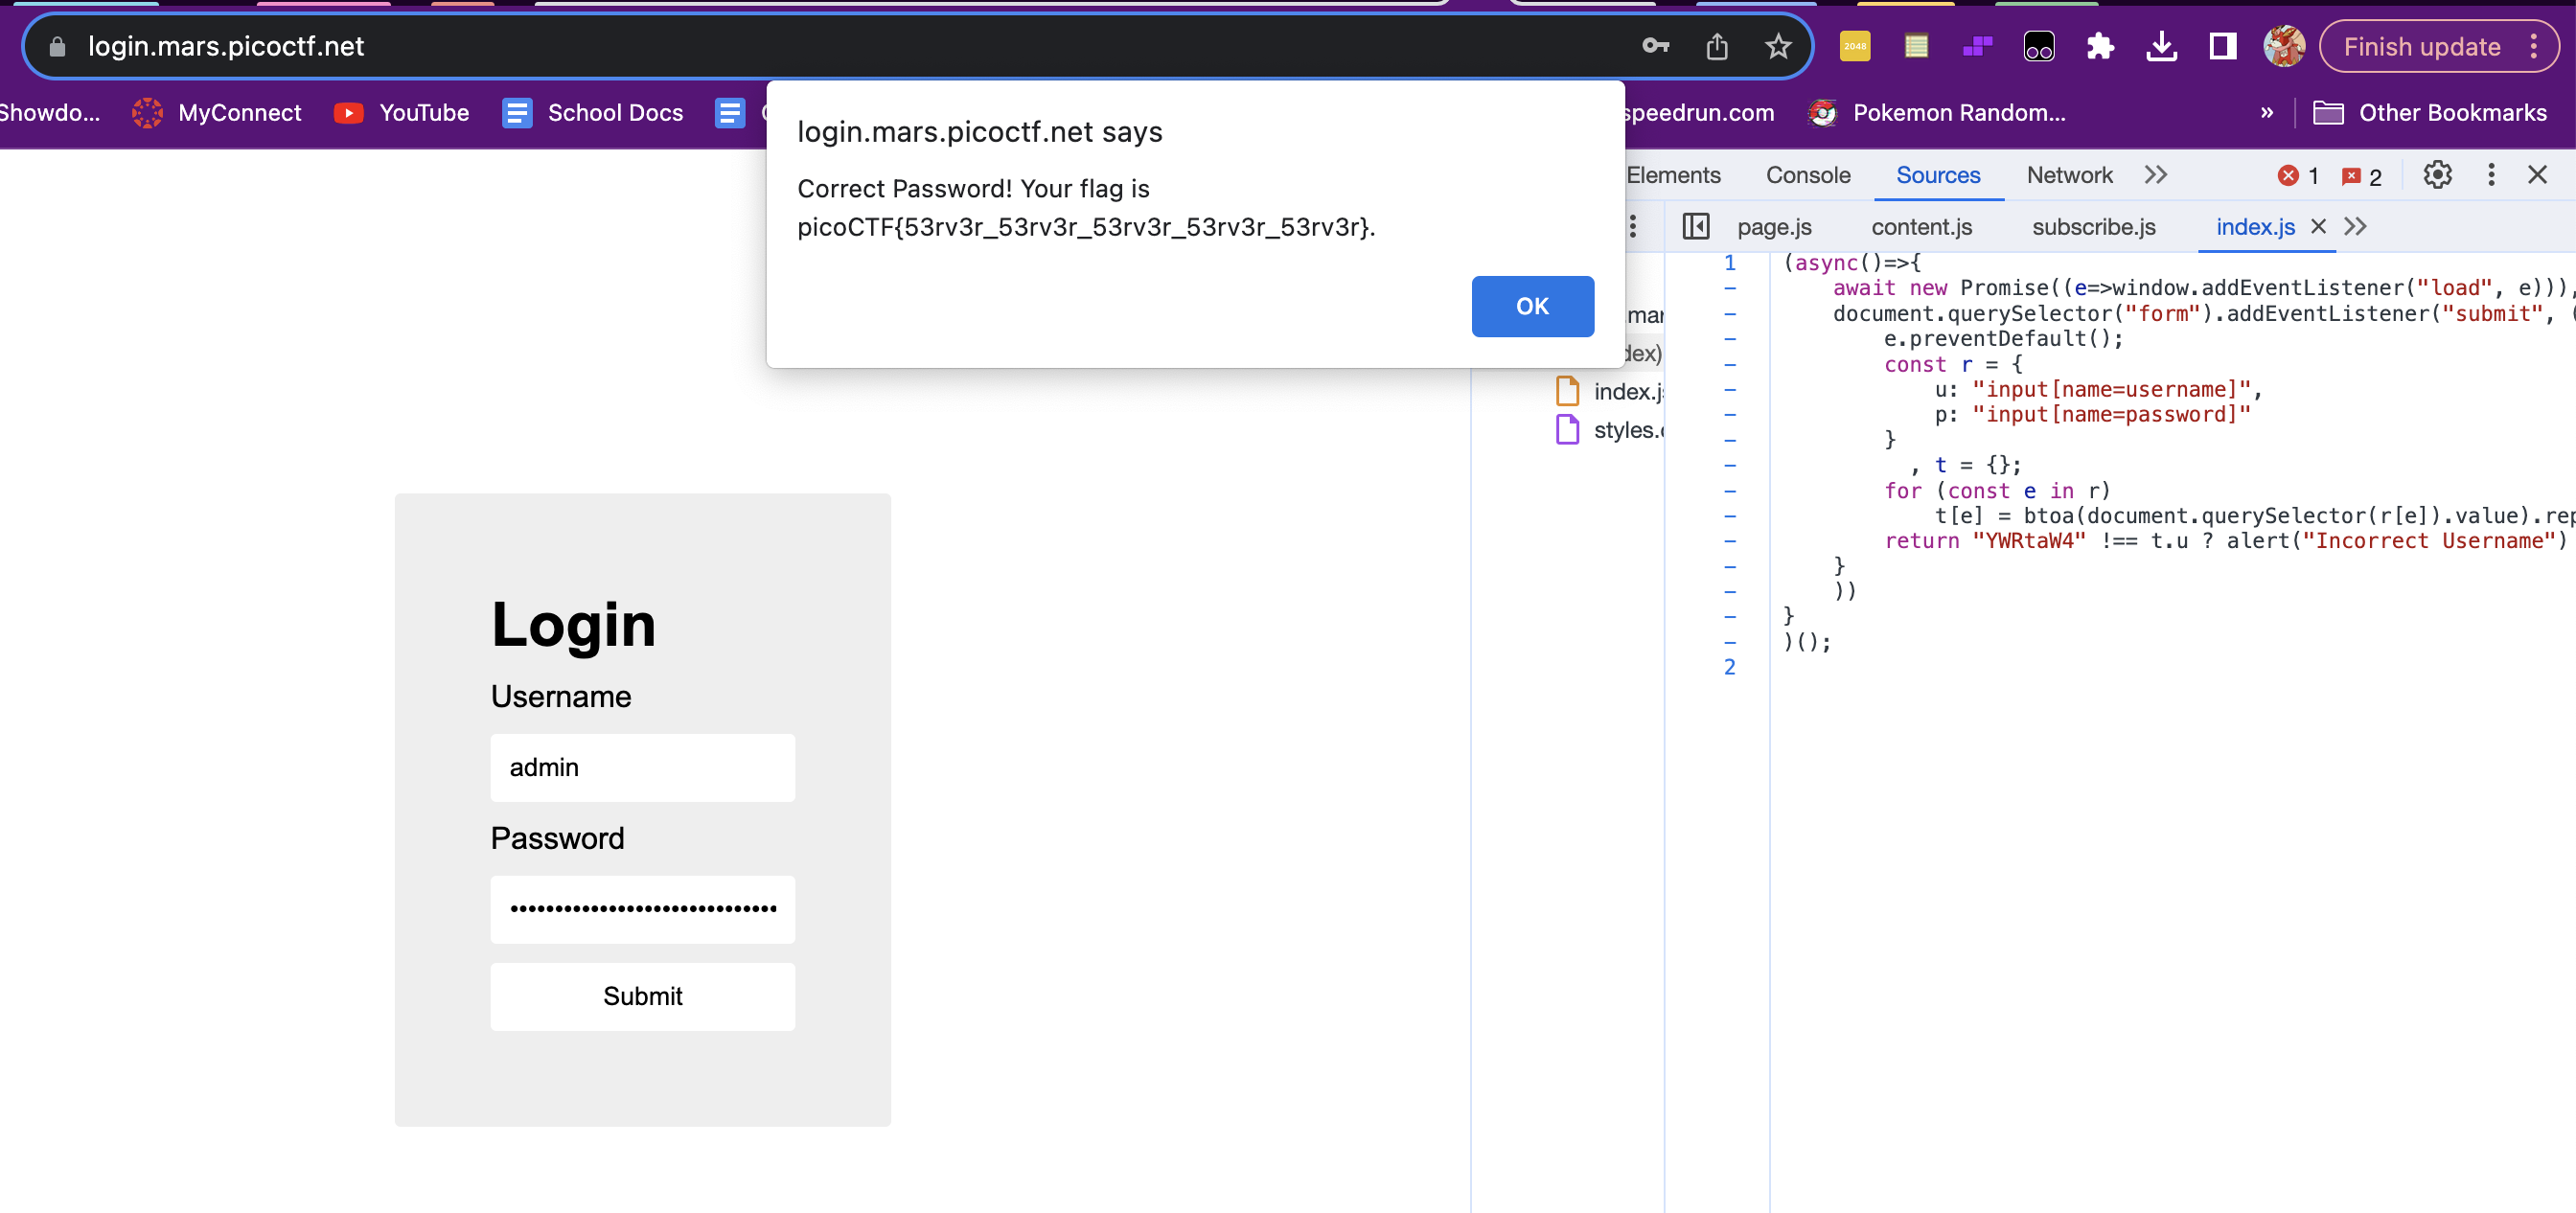
This was my first successfully-completed challenge, with a bit of help from Alex and Ethan who I approached about how picoCTF worked in the first place. Once we discovered that the strings in the JavaScript were the Base64-encrypted username and password respectively (“YWRtaW4” = “admin” and “cGljb0NURns1M3J2M3JfNTNydjNyXzUzcnYzcl81M3J2M3JfNTNydjNyfQ” = “picoCTF{53rv3r_53rv3r_53rv3r_53rv3r_53rv3r}”), it was easy to decrypt and solve this challenge.
Challenge 2: "Insp3ct0r"
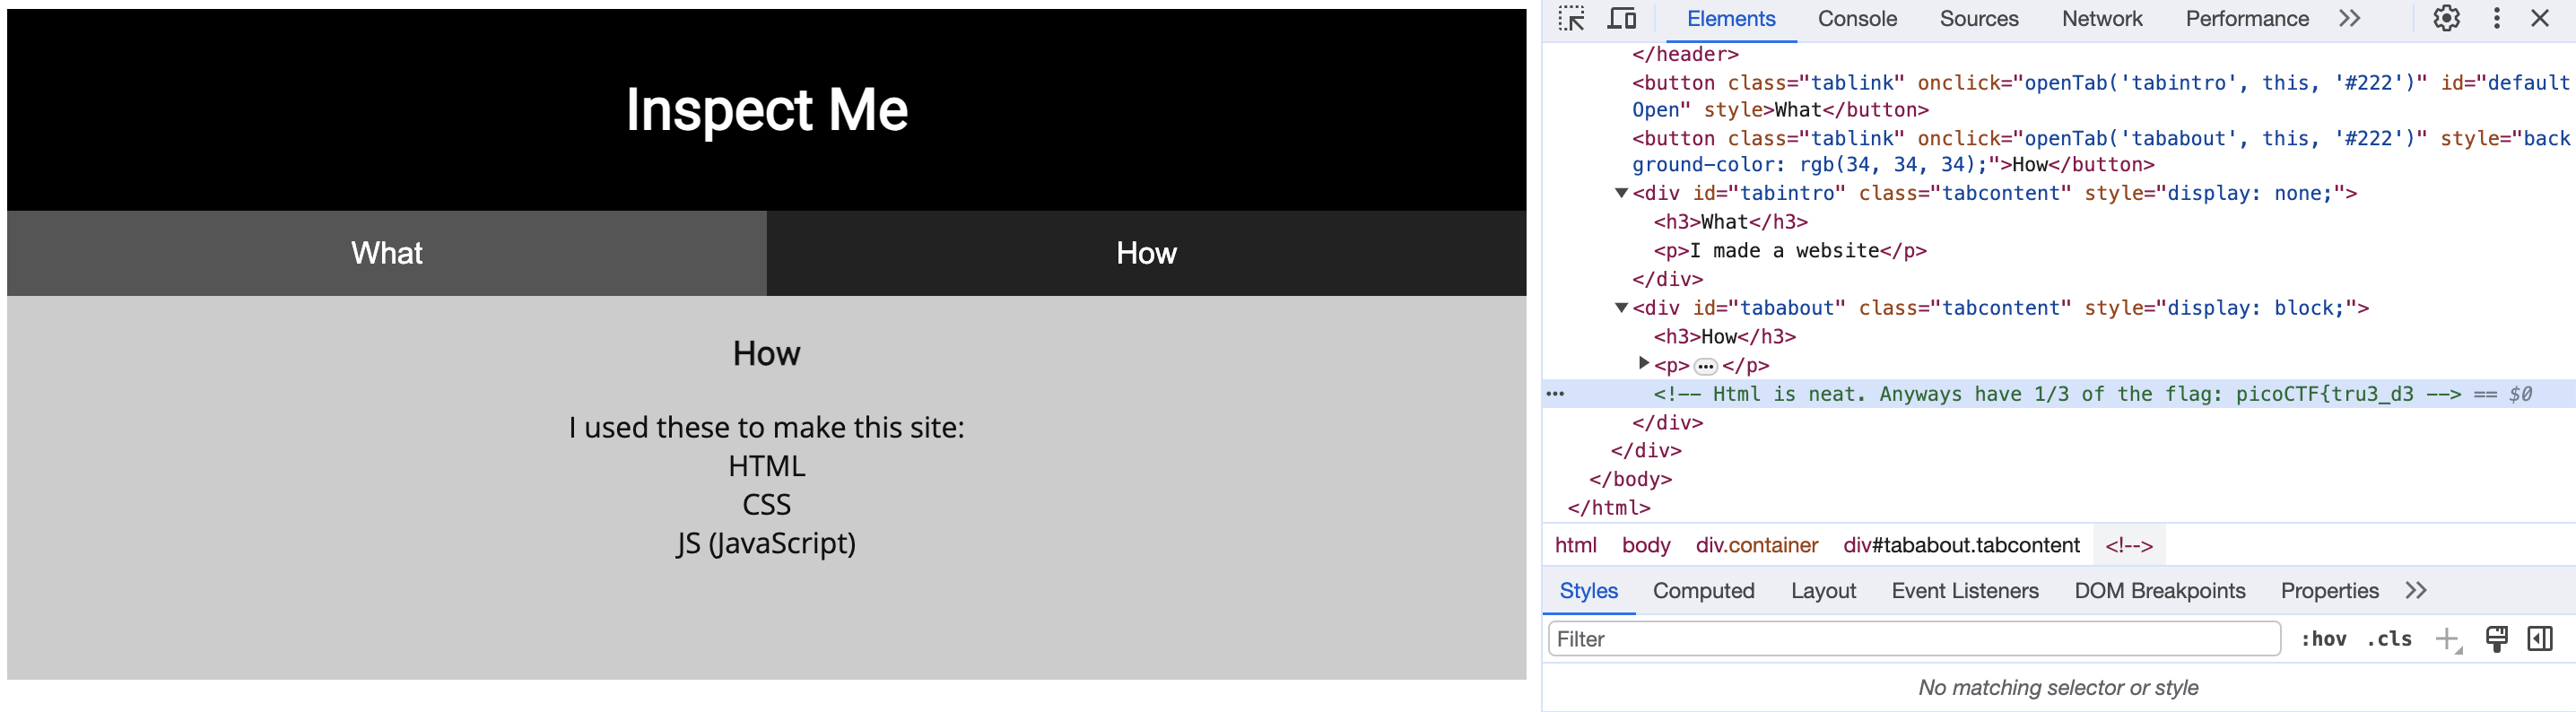
I feel kind of bad about doing this one because it’s incredibly easy. You notice pretty quickly that the use of HTML, CSS and JavaScript is the hint, so if you look at the HTML and the two sourced .js and .css files in the inspect element tab, there are comments with all three parts of the flag: “picoCTF{tru3_d3t3ct1ve_0r_ju5t_lucky?2e7b23e3}”
Challenge 3: "logon"
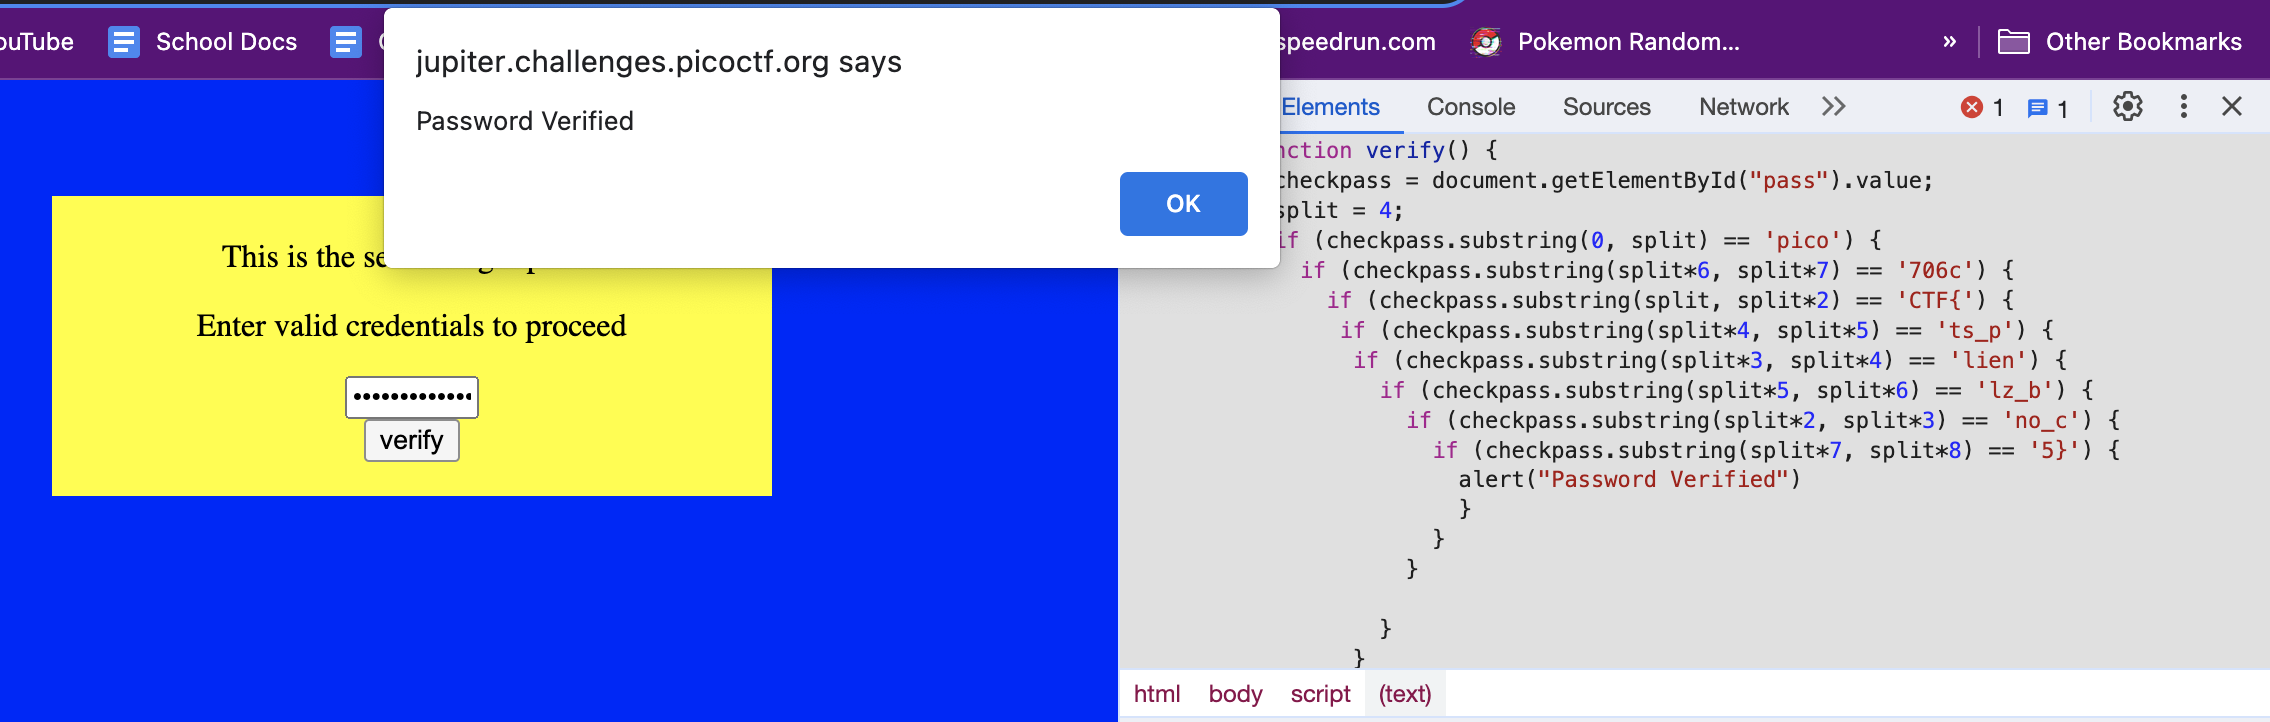
This beautifully-styled website provides the picoCTF flag through a bunch of randomly-shuffled substring methods. By looking at the first multiplier to the split variable, you can tell the order that the substrings that are checked go in: “picoCTF{no_clients_plz_b706c5}”.
Challenge 4: "Cookies"

This was a bit of a lame challenge, though there might have been some layer of complexity I was missing. I kept the cookie storage open while inputting things like “snickerdoodle” and “gingersnap” and noticed that the “value” of the cookie changed with each type of cookie shown, so I kept changing it until I got to 18, which displayed this flag solution. It did take some surveilance of the cookie storage and noticing the pattern to figure it out, but I wonder what the siginificance of 18 was. This certainly shows a potential security risk if a user were to use editing a cookie to manipulate a page.
Challenge 5: "Scavenger Hunt"

I was going to skip this one because I thought it was the same as the lame Inspector one, but it turned out to require a bunch of research because it was five parts. The first two pieces are in the HTML and CSS, but in the JavaScript, it asks “How can I keep Google from indexing my website?” I looked it up and found some info about the Google Search Console and ways that things can be hidden, and one of the files mentioned was robots.txt.
Putting that in the URL showed a new segment with another clue: “I think this is an apache server… can you Access the next flag?” I looked up Apache server access and found info on .htaccess files, so I tried putting that in the URL and got a new part and a message. It says “I love making websites on my Mac, I can Store a lot of information there.”
I was really stumped on this one after searching, since I thought it was referring to some kind of actual store, but I ended up finding a blog about this question that brought me the rest of the way to the answer. The hint was referring to the Mac-specific DS_Store file for the desktop, so I added that to the URL and it gave me the final piece of the flag. This one required a lot of research and I ended up learning a lot about preventing Google from indexing.
-
Implement DotEnv in one of your projects and document the process. (THIS HACK WAS REMOVED)
-
Capture the TCP and TLS protocols of your own springboot server project and document the steps in a blog. (Hint: Use Wireshark to capture the data.)
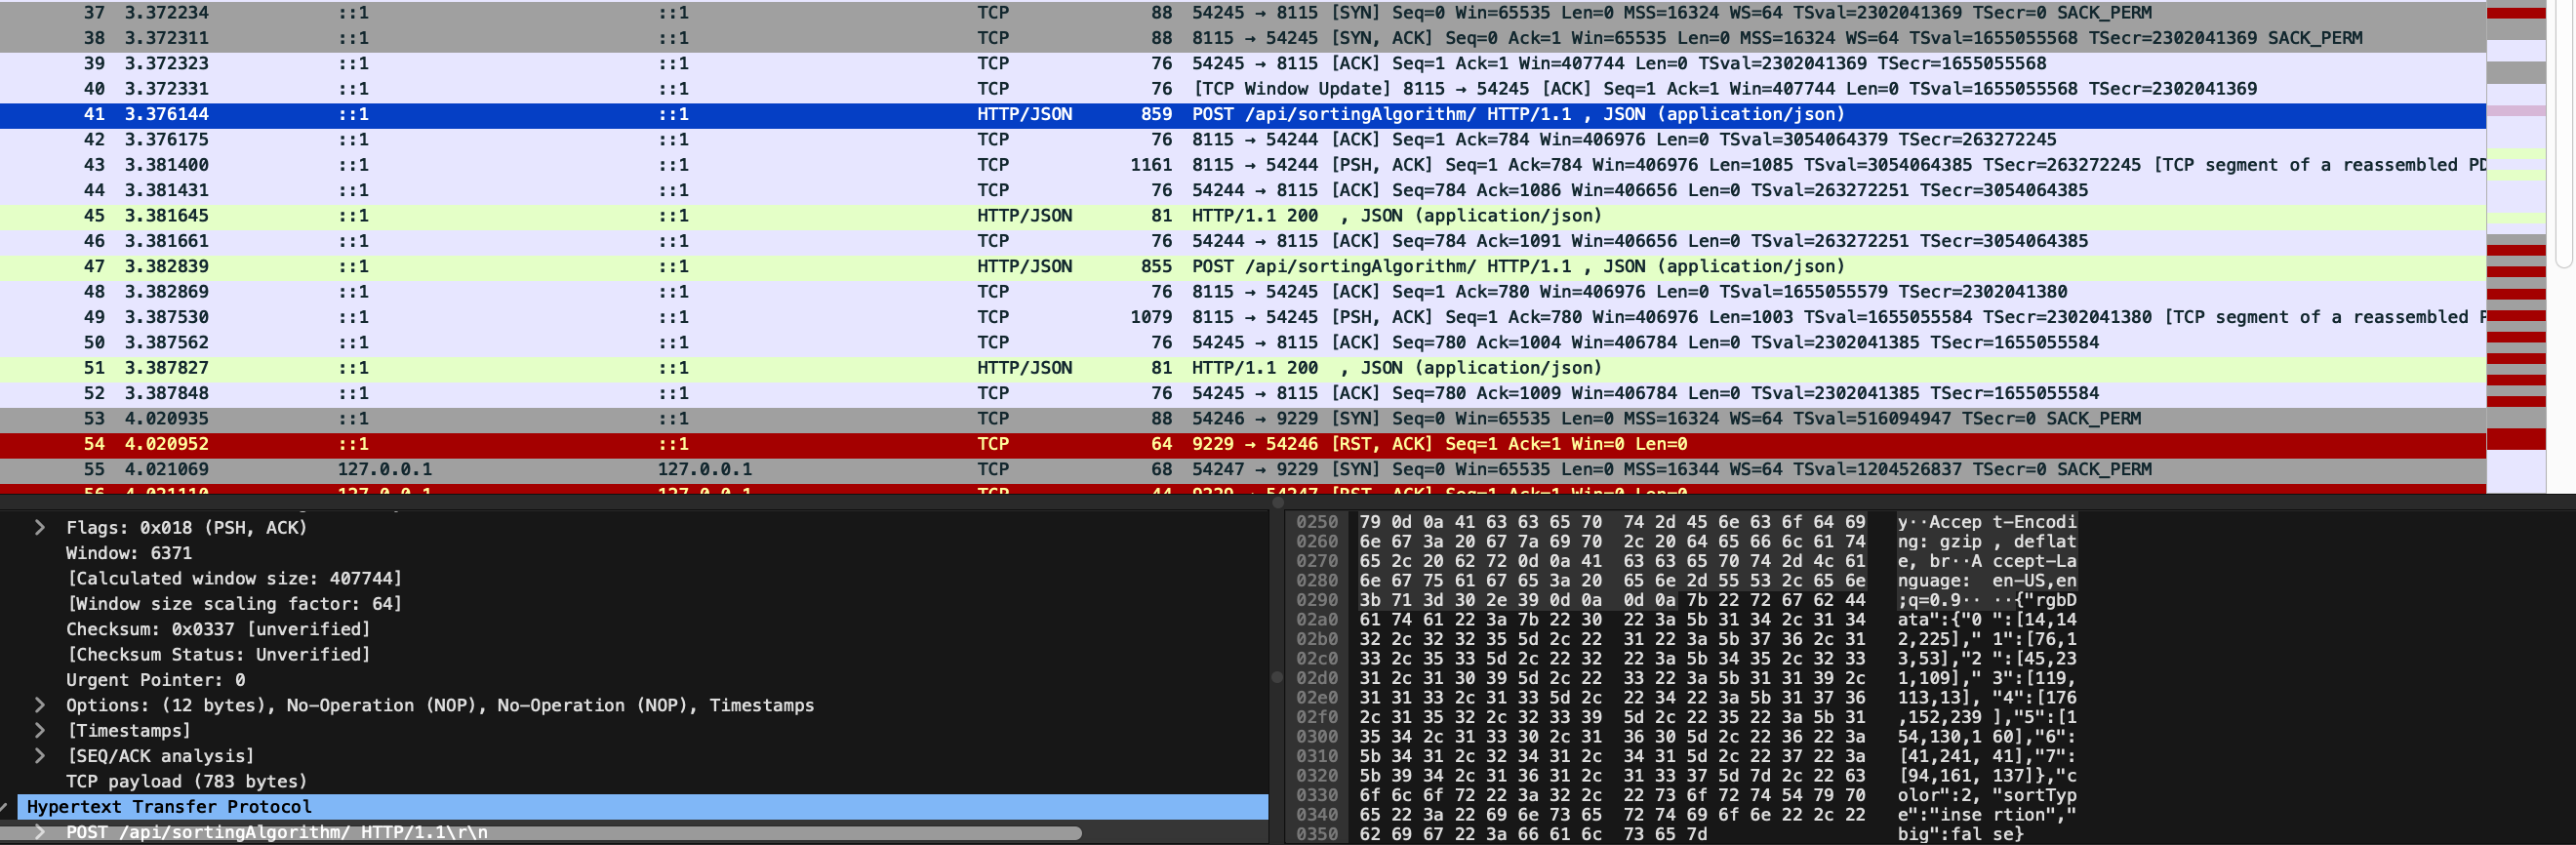
I captured a screenshot of the initial client data transfer here, but the rest of the purple and light green processes below it are the remaining part of the TCP. Process no. 37 shows the initial synch step where connection is started and ISN is created. 38 has the connection established and acknowledged between the client and server. The following processes are post-acknowledgement. 41 contains the JSON info sent from the frontend to the backend in the POST request, including info that shows that it’s an insertion sort being made. 43 is from the backend, containing the CORS policies and the sorted output that goes to the frontend page. A second POST request is made in 47 with a merge sort request instead with new data, and 49 has the new sort from the backend sent.
- Show and explain how CORS has been used in your previous projects.
// support cors
.cors(Customizer.withDefaults())
.headers(headers -> headers
    .addHeaderWriter(new StaticHeadersWriter("Access-Control-Allow-Credentials", "true"))
    .addHeaderWriter(new StaticHeadersWriter("Access-Control-Allow-ExposedHeaders", "*"))
    .addHeaderWriter(new StaticHeadersWriter("Access-Control-Allow-Headers", "Content-Type", "Authorization", "x-csrf-token"))
    .addHeaderWriter(new StaticHeadersWriter("Access-Control-Allow-MaxAge", "600"))
    .addHeaderWriter(new StaticHeadersWriter("Access-Control-Allow-Methods", "POST", "GET", "OPTIONS", "HEAD"))
Here is the CORS section of the SecurityConfig.java` file from my most recent mini-project. Obviously, CORS is in place to prevent malicious sites from making requests to this backend without permissions, or making improper requests from the allowed site. Below, I go more specifically over the lines. The very last line was commented out for local use, but it would typically be used to specify the origins allowed to make requests to the backend.
.addHeaderWriter(new StaticHeadersWriter("Access-Control-Allow-Credentials", "true"))
This line indicates that the browser should include credentials like cookies or HTTP authentication. The line following allows all headers to be exposed and accessed from the frontend. The one after specifies the headers allowed to be used for a request.
.addHeaderWriter(new StaticHeadersWriter("Access-Control-Allow-MaxAge", "600"))
This limits the amount of seconds a preflight request (made before the actual request to gauge safety) can be cached.
.addHeaderWriter(new StaticHeadersWriter("Access-Control-Allow-Methods", "POST", "GET", "OPTIONS", "HEAD"))
This final line specifies the allowed HTTP methods to be used with the backend.
CORS was more important in a project that properly utilized a login system like the trimester 1 project, which utilized a login system and potential user data. While that user data was not necessarily sensitive, password compromisation can be a serious problem and it would still be bad for users’ site data to be lost, since it exists for their convenience. In this case, with the mini-project, it acts more to ensure that the proper requests are being made from the right source.
Extra +0.1
- Find a modern example of SQL Injection, XXS, or another exploit, describe how it has been done, how it has been fixed, and how it could have been prevented.
SQL Injection
Example: Sony Pictures Cyber Attack (2014)
How it was done: The attackers exploited a vulnerability in Sony’s website forms by injecting malicious SQL queries, allowing them to manipulate the database and retrieve/modify information. No specific information on the SQL queries themselves has been publicized (probably to prevent people from trying it on other sites), but it is known that they used basically the same simple query exploits as those shown in this lesson.
How it was fixed: After the attack, Sony implemented more stringent input validation and parameterized queries to prevent SQL injection. They also enhanced their overall cybersecurity through measures like regular security audits.
Prevention: To prevent SQL injection, organizations should use parameterized queries, input validation, and employ web application firewalls (WAFs) to filter and block malicious SQL queries. By not making direct queries in most of our projects, we prevent a lot of the more basic SQL injection exploits.
XXS
I talked a little bit about it before in this lesson, but I’ll add some more information here.
Example: MySpace Samy Kamkar Worm (2005)
How it was done: The worm exploited a vulnerability in MySpace’s profile page, allowing the creator to inject malicious JavaScript code into user profiles. All that the code did was display the string “samy is my hero” on the profile page. When other users viewed the infected profiles, the code executed and added the user to the friend list, spreading the worm.
How it was fixed: MySpace responded by patching the vulnerability (not specified how anywhere, probably for privacy) and removing the code. They also enhanced their security measures, added input validation checks and implemented strict content security policies.
Prevention: To prevent XSS attacks, developers should verify user inputs, validate and escape output, and implement content security policies to restrict the execution of scripts from unauthorized sources. I think the last thing is the most important in this specific case.