4.3a Parallel Computing Notes
Observe an algorithm using parallel computing in Python code.


- Analyzing Parallel Computing
- Sequential Processing
- Parallel Computing
- Observing Parallel Computing and Threads
- Hacks
Analyzing Parallel Computing
Once again we will use image lab, this time to review Parallel Computing.
- Change baseWidth in this line in code to increase computation requirements:
def process_image(image, baseWidth=512):For instance 320, 512, 1024, 2048, 4096.- Compare Sequential and Parallel computing code and time to achieve outputs
from IPython.display import HTML, display
from pathlib import Path  # https://medium.com/@ageitgey/python-3-quick-tip-the-easy-way-to-deal-with-file-paths-on-windows-mac-and-linux-11a072b58d5f
from PIL import Image as pilImage # as PIL Image is used to avoid conflicts
from io import BytesIO
import base64
import numpy as np


# prepares a series of images
def image_data(path=Path("images/"), images=None):  # path of static images is defaulted
    if images is None:  # default image
        images = [
            {'source': "Internet", 'label': "Green Square", 'file': "green-square-16.png"},
            {'source': "Peter Carolin", 'label': "Clouds Impression", 'file': "clouds-impression.png"},
            {'source': "Peter Carolin", 'label': "Lassen Volcano", 'file': "lassen-volcano.jpeg"}
        ]
    for image in images:
        # File to open
        image['filename'] = path / image['file']  # file with path
    return images

# Scale to baseWidth
def scale_image(img, baseWidth):
    scalePercent = (baseWidth/float(img.size[0]))
    scaleHeight = int((float(img.size[1])*float(scalePercent)))
    scale = (baseWidth, scaleHeight)
    return img.resize(scale)

# PIL image converted to base64
def image_to_base64(img, format):
    with BytesIO() as buffer:
        img.save(buffer, format)
        return base64.b64encode(buffer.getvalue()).decode()

# Convert pixels to Grey Scale
def grey_pixel(pixel):
    average = (pixel[0] + pixel[1] + pixel[2]) // 3  # average pixel values and use // for integer division
    if len(pixel) > 3:
        return( (average, average, average, pixel[3]) ) # PNG format
    else:
        return( (average, average, average) )

# Convert pixels to Red Scale
def red_pixel(pixel):
    if len(pixel) > 3:
        return( (pixel[0], 0, 0, pixel[3]) ) # PNG format
    else:
        return( (pixel[0], 0, 0) )

# Convert pixels to Red Scale
def green_pixel(pixel):
    if len(pixel) > 3:
        return( (0, pixel[1], 0, pixel[3]) ) # PNG format
    else:
        return( (0, pixel[1], 0) )

# Convert pixels to Red Scale
def blue_pixel(pixel):
    if len(pixel) > 3:
        return( (0, 0, pixel[2], pixel[3]) ) # PNG format
    else:
        return( (0, 0, pixel[2]) )

# Set Properties of Image, Scale, and convert to Base64
def image_management(image, baseWidth):  # path of static images is defaulted
    # Image open return PIL image object
    img = pilImage.open(image['filename'])

    # Python Image Library operations
    image['format'] = img.format
    image['mode'] = img.mode
    image['size'] = img.size
    # Scale the Image
    img = scale_image(img, baseWidth)
    image['pil'] = img
    image['scaled_size'] = img.size
    image['numpy'] = np.array(img.getdata())
    # Scaled HTML
    image['html'] = '<img src="data:image/png;base64,%s">' % image_to_base64(image['pil'], image['format'])

    # Grey HTML
    # each pixel in numpy array is turned to grey
    # then resulting list, using List Comprehension, is put back into img
    img.putdata([grey_pixel(pixel) for pixel in image['numpy']])
    image['html_grey'] =  '<img src="data:image/png;base64,%s">' % image_to_base64(img, image['format'])

    # Red HTML
    img.putdata([red_pixel(pixel) for pixel in image['numpy']])
    image['html_red'] =  '<img src="data:image/png;base64,%s">' % image_to_base64(img, image['format'])

    # Green HTML
    img.putdata([green_pixel(pixel) for pixel in image['numpy']])
    image['html_green'] =  '<img src="data:image/png;base64,%s">' % image_to_base64(img, image['format'])

    # Blue HTML
    img.putdata([blue_pixel(pixel) for pixel in image['numpy']])
    image['html_blue'] =  '<img src="data:image/png;base64,%s">' % image_to_base64(img, image['format'])


def process_image(image, baseWidth=320):
    image_management(image, baseWidth)
    print("---- meta data -----")
    print(image['label'])
    print(image['source'])
    print(image['format'])
    print(image['mode'])
    print("Original size: ", image['size'])
    print("Scaled size: ", image['scaled_size'])

    print("-- images --")
    display(HTML(image['html']))
    display(HTML(image['html_grey']))
    display(HTML(image['html_red']))
    display(HTML(image['html_green']))
    display(HTML(image['html_blue']))
if __name__ == "__main__":
    # setup default images
    images = image_data()

    # Sequential Processing
    for image in images:
        process_image(image)

    print()


Parallel Computing
In parallel or concurrent mode, the ThreadPoolExecutor is used to submit each image to a separate worker thread, allowing multiple images to be processed simultaneously. Multithreading allows multiple concurrent tasks of a process at the same time. The
executor.map()method is used to apply theprocess_imagefunction to each image in the images list.
The order in which the images are processed is not guaranteed, as threads are performed simultaneously.
Test edit.
import concurrent.futures

# Jupyter Notebook Visualization of Images
if __name__ == "__main__":
    # setup default images
    images = image_data()

    # Parallel Processsing
    # executor allocates threads, it considers core execution capability of machine
    with concurrent.futures.ThreadPoolExecutor() as executor:
        executor.map(process_image, images)  # order is not predictable

    print()
Observing Parallel Computing and Threads
You can observe Processes, CPU Percentage, and Threads with Tools on your machine. Common tools to monitor performance are Activity Monitor on MacOS or Task Manager on Windows.
- This example is using
toplaunched in VSCode Terminal. (mac) - Try
top -Hfor linux.- PID is Process ID.
- COMMAND is task running on machine. Python is activated when running this Jupyter notebook.
- #TH is number of threads. This increases from 15/1 to 18/1 on my machine when running python parallel computing example.
Hacks
AP Classroom Video Notes
I decided to take notes on the College Board video to make sure I understood the content well.
- Sequential computing is a model where code occurs one at a time in order
- Takes as long as the sum of its operations
- Parallel computing breaks it down into smaller parts and does some at the same time
- Takes as long as the sum of its sequential operations plus its longest parallel
- Parallel is typically faster than sequential, but requires newer hardware and works best when the tasks don't rely on each other
- Distributed computing is a model that uses multiple devices to run a program
- The "speedup" of a parallel task is determined by dividing the amount of time it took to do sequentially by the amount of time it took parallel
- Computers automatically run their processes parallel to each other
- There are system tasks and user tasks
- Tasks are done sequentially when the results of one are contingent on previous tasks
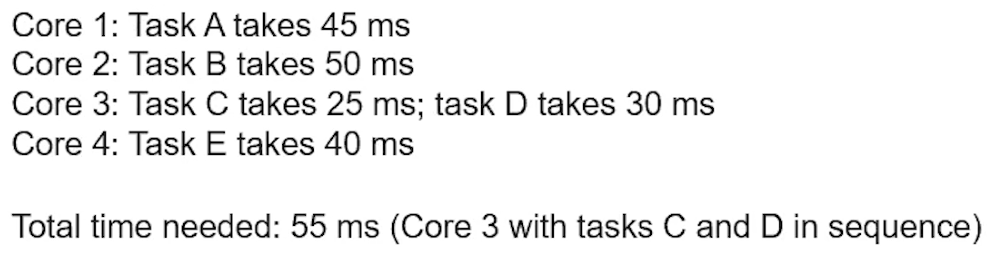
- Here is a helpful image to remember how to determine the amount of time necessary to finish a parallel task:
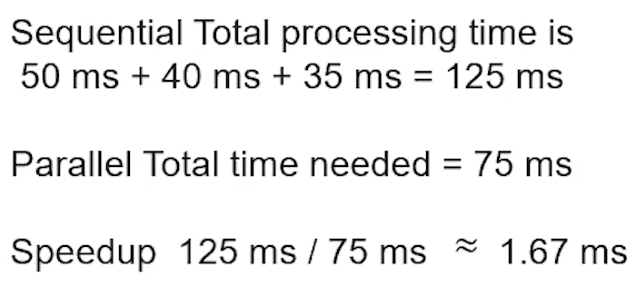
- This shows how you can calculate speedup:
AP Classroom Video Questions
Example 1
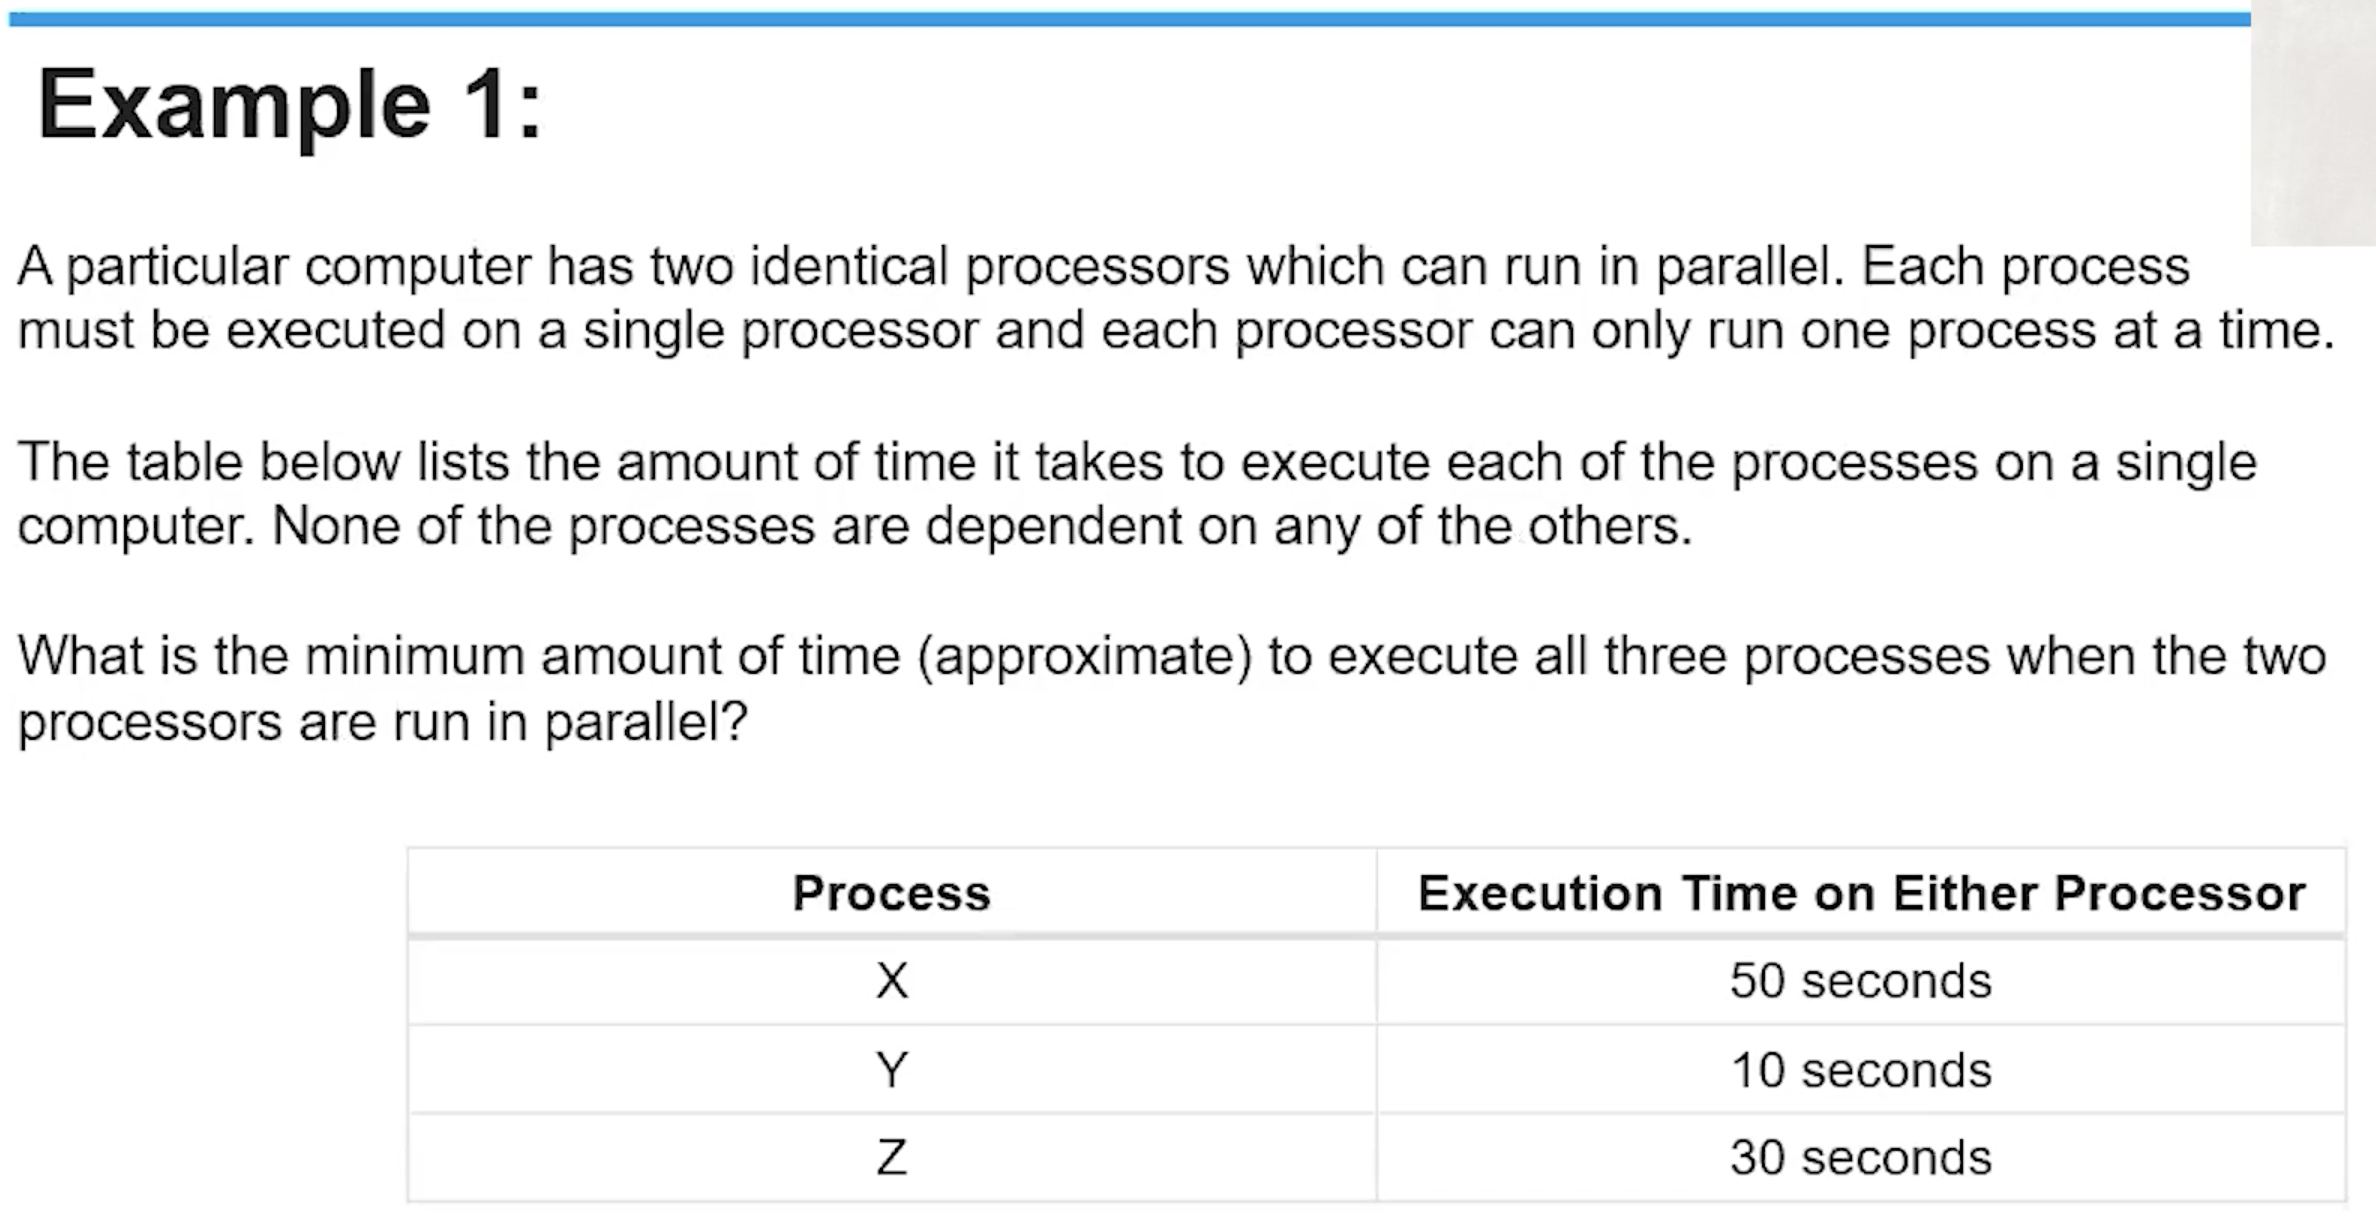
My answer is 50 seconds. The fastest processing time would be produced by completing tasks Y and Z on the same processer, and leaving task X, which takes longer than the combined duration of Y and Z, on the remaining processor. Since X would run for 50 seconds at the same time as Y and Z, which sum up to 40 seconds, the processing time would be the minimum of 50 seconds.
The correct answer was 50 seconds.
Example 2
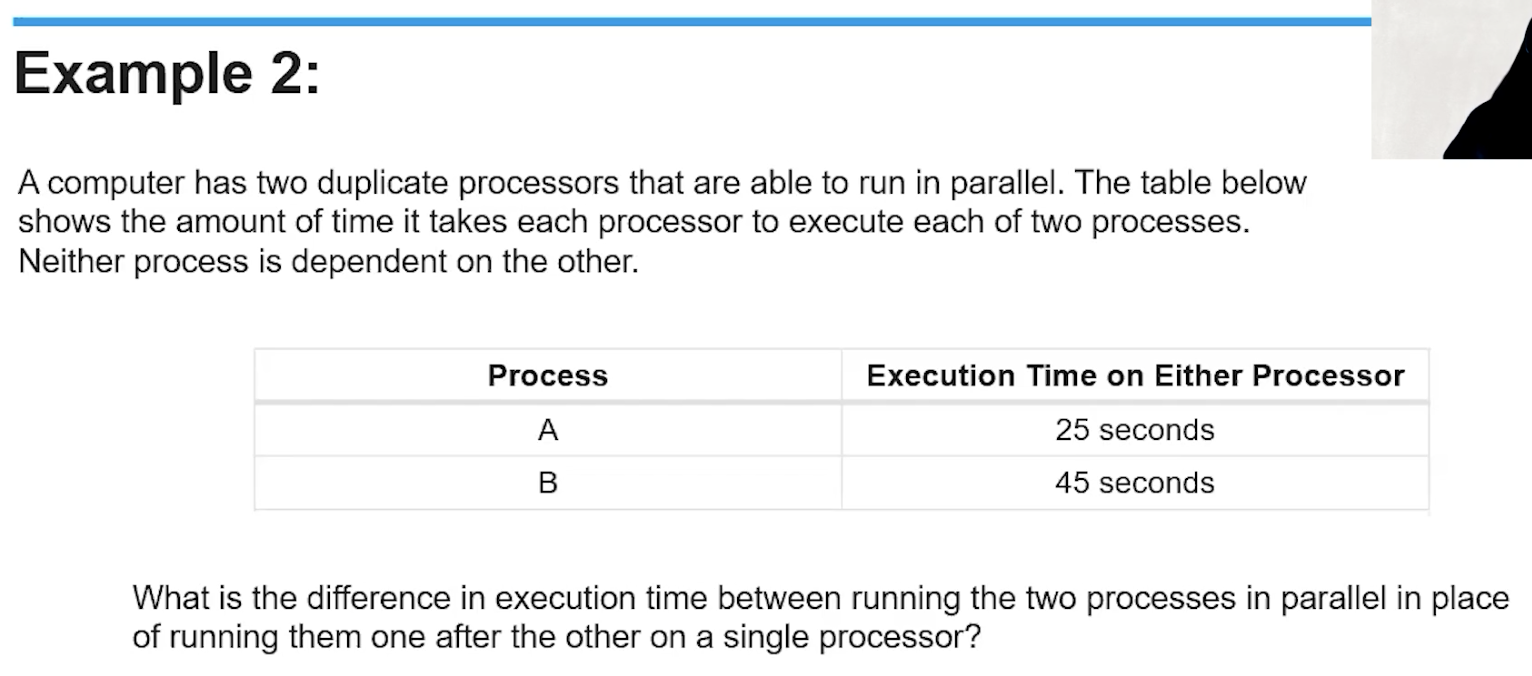
The difference in execution time would be 25 seconds, since running them parallel would take at least 45 seconds due to task B's duration while running them sequentially woudl take 70 seconds, the sum of the times of tasks A and B.
The correct answer was 25 seconds.
List Comprehension Examples
Here's a basic example, using the math sqrt function to find the square roots.
from math import sqrt

numbers = [64, 49, 16, 144, 169, 289, 225]
roots = [int(sqrt(num)) for num in numbers]

print(roots)
Here's an example with a more complicated loop, which displays all examples in the list pokemon with the letter "q" in them. It even incorporates lower so that it can detect names that start with capital "Q" as well.
pokemon = ["Quagsire", "Slugma", "Gulpin", "Qwilfish", "Swalot", "Rayquaza"]
qmon = [mon for mon in pokemon if "q" in mon.lower()]

print(qmon)
Conditions like this also make for easy shorthands to create sorted number lists.
evenhund = [num for num in range(1, 101) if num % 2 == 0]
print(evenhund)
Earlier in the year, one of my friends made this system by making a huge list full of even numbers. Now, the list can be created in just one line of code.